User's guide (AKA Tips & Tricks) (AKA Demo script)
Table of Contents
- User's guide (AKA Tips & Tricks) (AKA Demo script)
- How to use Semantic Coloring
- How to use Code Completion
- How to use Code Generation dialog
- How to add import statements for one or more classes
- How to get rid of unused imports
- How to use Highlights
- How to use Instant Rename
- How to use Surround With
- How to use Java syntax based selection
- How to use the Error Stripe
- How to use Live Templates
- How to get fast to Javadoc and how to fix Javadoc using hints
- How to navigate through code
- How to Refactor code
How to use Semantic Coloring
Semantic coloring permits for using different colors based on semantic information about the code. Using the coloring you can immediately recognize what you are doing in some cases
- Fields, parameters, variables: Probably most important coloring. You can immediately see whether you are working with field, parameter or local variable. This may help you recognize whether you are modifying the state of the class or whether your method has no side effect.

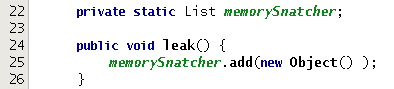
- Static members: Static members are distinguished from instance members (by using an italic font by default). If you see a collection in italics you should think twice before you put something into it, it may result into a nice memory leak.
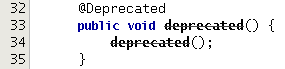
- Deprecated members: Using deprecated methods or classes results in rendering the references/calls in strike-through text. This should warn you immediately when you write code relying on deprecated code.
- Unused members: Unused private methods, classes, variables and fields are drawn in grey (by default). You may want to get rid of such declarations.

- Unused imports: Unused imports are drawn in grey (again, by default). They also produce warnings and let you fix them using a hint (by either clicking the light bulb or pressing {Alt+Enter}.

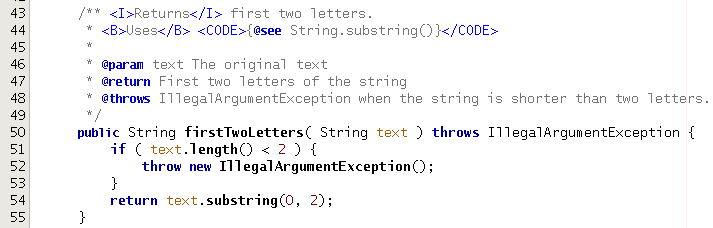
- Javadoc: The HTML code in Javadoc is now syntactically colored for better readability.
- Other colorings: For complete list of semantic colorings please go to Tools->Options->Fonts & Colors and pick Java from the "language" combo box. Please let us know if you are missing yours favourite semantic coloring.
Demo class name: AllColorings
How to use Code Completion
Code completion was improved in several ways.
- Code completion behavior Ctrl+Space - completes all symbols which are already imported in the file, plus of course symbols from the java.lang package. Pressing Ctrl+Space again will offer all symbols from the project class path regardless whether imported or not. If you want to go to the list of all types immediately you can use the All Symbols Completion, which is invoked by pressing Ctrl+Alt+Space.
- Smart completion - Notice that the standard completion listbox is divided into two parts separated by a black line. The first section includes the smart completion items. To determine list of these items the code completion uses the current context (i.e. the position of caret) when completion is invoked. See other bullet points below starting with smart for more information and examples of the smart completion feature.
- Completing Keywords Code completion should know which keywords fit into which place. So you may use it for completing keywords. Just don't be surprised if you don't see the keyword if. It is so short that we decided not to put it into code completion.
- Field/Variable names When you introduce a new field or variable, you often want its name to mimic its type. Code completion now supports this. To prepend a prefix to the guessed name, simply type the prefix and then invoke code completion. This works for method names as well.

- Smart completion examples what follows is a list of places where the smart completion kiks in.
- After new (with generics) Will help especially when you are declaring a field or variable with complicated generics.

- In method call parameters Smart completion will offer only those fields, variables, methods which can be pased as argument to the method.
- Smart code completion for types
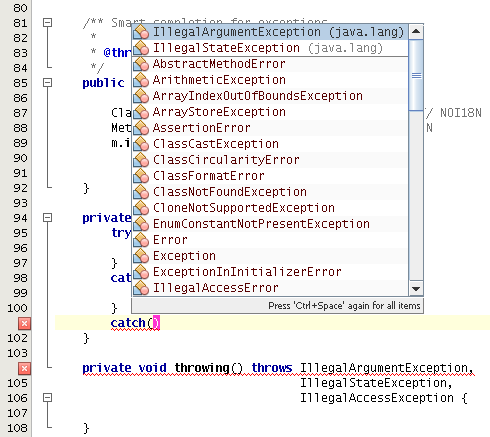
- For exceptions In the catch block smart completion will offer only those exceptions which have been thrown in the try block but not yet caught.
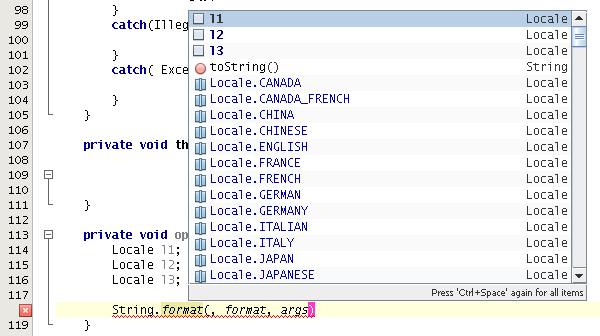
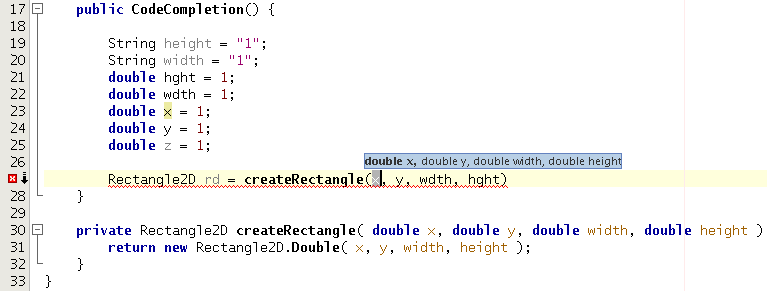
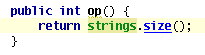
- Parameter guessing Code completion of method calls guesses which variable, field or parameter should be used based on type and similarity of the name. See the screenshot to see how the correct variables were picked by the code completion when completing the call to createRectangle() method.
- Code completion ending character Notice that you may select the item of choice with different keys. Selecting with Enter you'll get what you expect. Should you select the item with ".", "," or ";" the code completion will append the char at the end of the completed word.
- Generics in generation of implementation
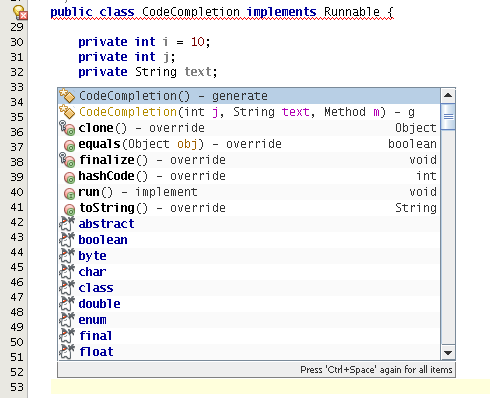
- Creation of elements - Invoking code completion between the class members will offer you to create constructor (default one and one initializing uninitialized fields), override methods and implement methods. For more code generation featues please look at the code generation dialog section.
- Completion for annotations
- Completion in Collections.<String>| - works fine when Collections is imported.
How to use Code Generation dialog
- The Java editor is capable of generate often used constructs for you automatically. Press Alt+Insert to invoke the code generation menu and pick what you want to generate.
How to add import statements for one or more classes
There are several ways to do add import statements.
- Use error hints: Click on the error mark with the light bulb or press Alt+Enter. It will offer you a list of possible classes to import. Pick the proper hint and you are done.

- Use the import class dialog: Put the caret into the name of the not imported class and press Alt+Shift+I. You will get a dialog with classes to import.
- Use the smart fix import: Press Alt+Shift+F. You will get a dialog that lists all unresolved identifiers in the source. If there is more than one option for resolving the identifier you may choose using the combo box. The classes shown in gray do not fit for some reason. In the example below the Toolkit class in the com.sun.media.sound package does not have the method getDefaultToolkit(), which is called in the source.
How to get rid of unused imports
Put the caret on the line with an unused import (you may do so by clicking the warning mark in the error stripe) and invoke hints. You invoke hints either by using the mouse or pressing Alt+Enter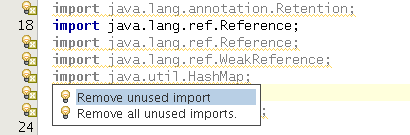
How to use Highlights
You can think of the highlights feature as an easy-to-use and more correct substitution for the editors Search. The IDE tracks the position of the caret and, based on it, highlights some parts of the code. The highlights are marked with a background color in the editor they are also put into the error stripe, which permits for having overview of the whole file. See "How to use instant rename" to have similar substitution for the Search and Replace feature of editor.
- Usages of element: Putting the caret on an identifier will highlight all usages of that identifier in the current source code.

- Method exit points: Putting the caret on the return type of a method definition will highlight all places where the method can exit.

- Exception throwing points: Putting the caret on an exception in a method declaration throws clause will highlight all the places where that exception can be thrown.
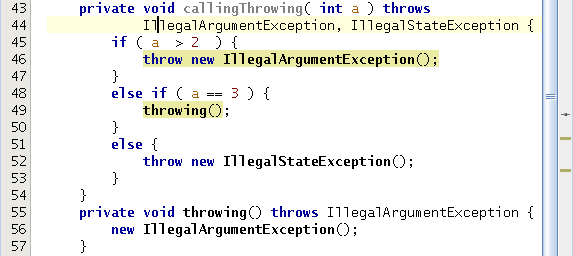
- Other highlights Putting the caret on an identifier in the extends or implements clause of a class will highlight all methods which override or implement methods in given class or interface. There are more such highlights. For complete list see the Mark Occurrences options.
Demo class name: Main
How to use Instant Rename
- If you want to rename a private member (field, method, variable ...), you have several options. a) Use the editor's "Search and replace", where you may end up replacing something you did not want to replace. b) Use the "Rename" refactoring, which is a bit heavyweight. Or you can use the instant rename feature.
Simply put the caret on the identifier and press Ctrl+R. All occurrences of the identifier will be highlighted blue, and when you start editing they will all change. Press Esc or Enter to finish the instant rename.
How to use Surround With
- If you want to surround a piece of text with a template. Just select the text and invoke hints Alt+Enter.

How to use Java syntax based selection
- Sometimes it is useful to do the selection based on the Java syntax rather than using standard editor selection. Press Alt+Shift+Up to expand the selection and Alt+Shift+Down to shrink the selection based on the structure of your Java source code.
How to use the Error Stripe
- The editor uses the error stripe on the right side of it to show information about interesting places in the code. These places include for example:
- Current line
- Errors
- Warnings
- Highlights (like usages of members or method exit points)
- Places where the code has been changed
- ...
The places are represented by small stripes of different colors.
How to use Live Templates
Type a few letters from the name of the template e.g. fo| and invoke the code completion.

Pick the template you want to use. If there is a suitable collection it will be filled in for you. Several parts of the template will be rendered in blue. You may cycle between them using the Tab key. Editing the fields will change the part of the code accordingly. Press Enter or Esc to finish editing the template. Notice that if you move out of the blue boxes with the cursor the "edit template mode" continues (so you may get back using the Tab key) till you do first edit outside of the blue box.
- Writting a new template You can define new templates using the templates "language" by going to Menu->Tools->Options, choose the Editor category and the Code Templates tab. You may want to look at how the existing Java templates look like and try to create your own. Or look below where the template language is shortly described.
Any code template parameter can be specified by its name and a set of optional hints. Hints serve as a guidance on computing the values assigned by the infrastructure to the parameters on template expansion. Syntax for parameter definition is: ${param_name hint=value hint=value ...}
with the exception of boolean hints that can be written without the value part: ${param_name hint} translates to ${param_name hint=true}.
Following parameter names are reserved by the infrastructure for handling caret and selection position:
| ${cursor} | defines a position where the caret will be located after the editing of the code template values finishes. |
| ${selection} | defines a position for pasting a content of the editor selection. Used by so called 'selection templates' that appear as hints whenever user selects some text in the editor. |
Similarly, some of the hint names are reserved by the code template infrastructure: General:
| ${param_name default="value"} | defines the parameter's default value. |
| ${param_name editable=false} | can be used to disable user's editing of the parameter. |
Java specific:
| ${param_name instanceof="java.util.Collection"} | requires the parameter value to be an instance of the given type. |
| ${param_name array} | requires the parameter value to be of an array type (including arrays of primitive data types). |
| ${param_name iterable} | requires the parameter value to be of an array type or an instance of "java.lang.Iterable". Can be used in 'for-each' cycles. |
| ${param type="java.util.Iterator"} | requires the parameter value to be the given type. The infrastructure will try to use short name Iterator and import java.util.Iterator if possible. |
| ${param_name iterableElementType} | requires the parameter value to be the type of the iterable element. Can be used in 'for-each' cycles. |
| ${param_name leftSideType} | requires the parameter value to be the type of the expression on the assignment's left side. |
| ${param_name rightSideType} | requires the parameter value to be the type of the expression on the assignment's right side. |
| ${param_name cast} | defines that the parameter value would be a type cast if necessary. |
| ${param_name newVarName } | defines that the parameter value should be a 'fresh' unused variable name in the given context. |
As an example consider the definition of the "iterator type" parameter of the forc standard template: ${IT_TYPE rightSideType type="java.util.Iterator" default="Iterator" editable=false} where:
- IT_TYPE is the parameter name,
- rightSideType tells the infrastructure - try to resolve the type of an expression on the right side of an assignment (e.g. java.util.Iterator<java.lang.String>) and use it as the parameter value (with possible autoimporting).
- If the type cannot be resolved type="java.util.Iterator" tells the infrastructure - try to resolve the java.util.Iterator type and use it as the parameter value (with possible autoimporting).
- If the type cannot be resolved default="Iterator" tells the infrastructure - use string "Iterator" as the parameter value.
- editable=false tells the infrastructure - do not allow a user to change the parameter value.
class name: LiveTemplates
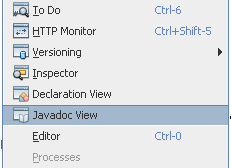
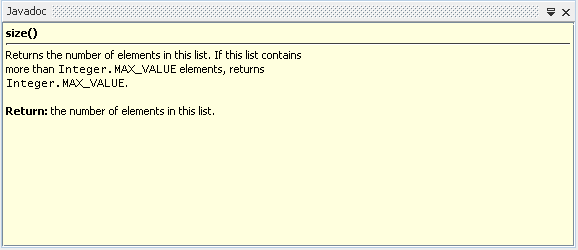
How to get fast to Javadoc and how to fix Javadoc using hints
- Javadoc popup window Put the caret to symbol of choice and press Ctrl+Shift+Space
- Javadoc view window Go to main menu Window->Javadoc View. This will open a separate window which always shows Javadoc for the element under caret.
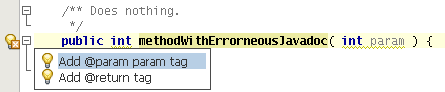
- Hints for fixing Javadoc. Missing or erroneous Javadoc can now be discovered and fixed using hints. As there is no GUI yet for hints settings you might be interested in following system properties which can limit the number of hints shown.
How to navigate through code
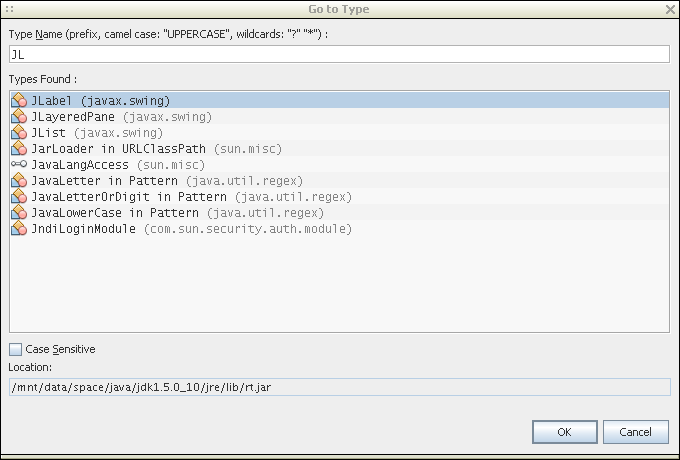
- Opening a type in the editor If you know the name of the type (class, interface, annotation or enum) you want to open press Alt+Shift+O and type the name into the dialog. Notice that you can use prefix, camel case and wild cards.
- Navigating to source or declaration Place the caret into name usage of an element and press Alt+O or Alt+G. The former will open the source declaration of the type in the editor the later will take you to the declaration (e.g. to the place where a variable is defined.
- Hyperlinking Similar action can be achived by holding down the Ctrl key and pointing to the element with the mouse.
- Implements/Overrides annotation Methods which implement or override other method are marked with a glyph in the editor gutter. Clincking the icon will take you to the overridden method or to the method from the interface. Pressing Ctlr+B does the same.
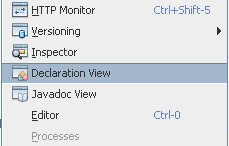
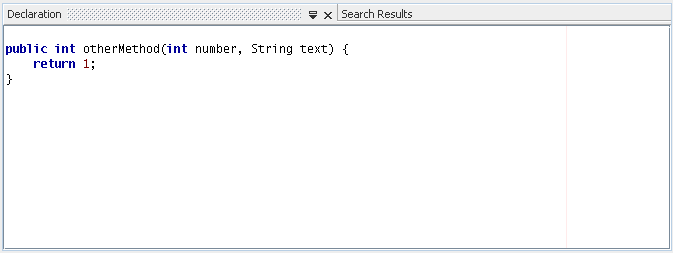
- Declaration Window If you are often interested in how declaration of given element looks like but you don't want to open it in the editor. You might want to open the Declaration View, which always shows the declaration of element under caret.
- Navigator window This window (can be opened from the Window menu) always show the members of class opened in editor or selected in the explorer. Double clicking on an item will take you to its source in the editor. If you start typing in the window you can easily find an element by its name.
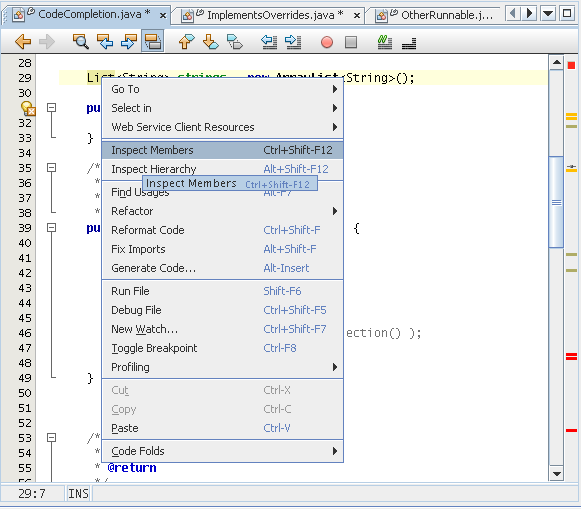
- Outlines Will show either members or inheritance hierarchy of element opened in editor (when invoked from the main menu) or currently under caret (when invoked from the editor popup menu).
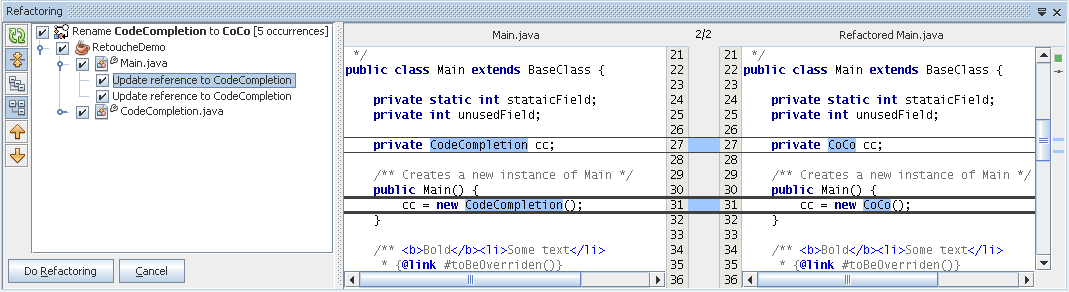
How to Refactor code
Place the caret into the symbol you want to refactor. Pick the refactoring either from the main menu or from the editor popup menu.
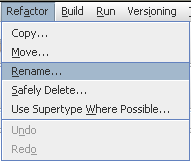
Fill in the necessary data in the refactoring dialog and choose either to refactor directly or show preview of the refactoring.
In the refactoring preview you can look at the diffs to make sure that it will do the desired change to your code.
