Adding Functionality to Buttons: A Beginners Guide
Contributed
by
and Tomas Pavek, maintained by Ruth Kusterer
This tutorial teaches you how to build a simple GUI with back-end functionality.
This tutorial is geared to the beginner and introduces the basic construction
of a GUI with functionality. A basic understanding of the Java Programming Language
is required.
This is a basic tutorial that takes the approach of teaching programming
from the GUI development perspective.
- The Matisse package is used to facilitate the GUI development.
- Matisse is available in NetBeans IDE 5.0 or better.
- We will learn how to develop a GUI and then add functionality to the
buttons used.
This document takes you through the fundamental concepts of GUI creation and
takes the approach taken in many self learning books. We will work through the
layout and design of a GUI and add a few Buttons and Text Boxes. The Text Boxes
will be used for receiving user input and also for displaying the program output.
The Button will initiate the functionality built into the front end.
The application we create will be a simple but functional calculator.
Expected duration: 15 minutes
Prerequisites
- The use should have basic skills in the Java language.
- The user should be comfortable with using the NetBeans IDE.
- The user should have already completed
the tutorial GUI Building in Netbeans IDE.
Software Needed for the Tutorial
Before you begin, you need to install the following software on your computer:
- Java Standard Development Kit (JDK™) version 1.4.2 or better
(download JDK 1.4.2)
or (download JDK 5.0)
- NetBeans IDE 5.0 or better (download).
Tutorial Exercises
Exercise 1: Creating a Project
The first step is to create a Project, we will name our project NumberAddition.
-
Choose File > New Project. Alternately, you can click the New Project
icon in the IDE toolbar.
-
In the Categories pane, select the General node. In the Projects pane,
choose Java Application. Click Next.
-
Enter NumberAddition in the Project Name field and specify a path
e.g. in your home directory as the project
location.
-
Ensure that the Set as Main Project checkbox is selected. Deselect Create
Main Class if it is selected.
-
Click Finish.
Exercise 2: Building the Front End
After creating the new application, you may have noticed that the Source Packages
folder in the Projects window contains an empty <default package>
node. To proceed with building our interface, we need to create a Java container
within which we will place the other required GUI components. In this step we'll
create a container using the JFrame component and place the container
in a new package.
Create a JFrame container
- In the Projects window, right-click the NumberAddition node and choose
New > JFrame Form.
- Enter NumberAdditionUI as the Class Name.
- Enter
my.NumberAddition as the package.
- Click Finish.
The IDE creates the NumberAdditionUI form and the
NumberAdditionUI class within the NumberAdditionUI.java
application, and opens the NumberAdditionUI form in the
GUI Builder. Notice that the my.NumberAddition
package replaces the default package.
Adding Components: Making of the Front End
Next we are going to populate our application's front end with one JPanel,
and three JLabels, JTextFields and JButtons each.
The JFrame with the aforementioned components will look like this.
Select Windows > Palette to open the Palette if you don't see it.
You use the Palette to drag and drop UI components to the design area.
- Start by selecting a JPanel from the Palette and drop it onto the JFrame.
- While the JPanel is highlighted, go to the Properties window
and click the "..." button next to Border to choose a border style.
- In the Border dialog, select Titled Border from the list,
and type in
Number Addition in the Title field.
Click OK to save the changes and exit the dialog.
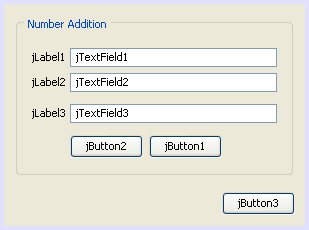
- You should now see an empty titled JFrame that says Number Addition
like in the screenshot. Look at the screenshot and add three
JLabels, three JTextFields and three JButtons as you see above.
Renaming the Components
In this step we are going to rename the components that were just added to the
JFrame.
- Double-click on jLabel1 and change the text property to
First
      Number
- Double-click on jLabel2 and change the text to
Second Number
- Double-click on jLabel3 and change the text to
Result
- Double-click on jTextField1 and remove the sample text in the text
field. You may have to resize the jTextField1 to its original size. Repeat
this step for jTextField2 and jTextField3.
- Double-click on jButton1 and rename it
Clear
- Double-click on jButton2 and rename it
Add
- Double-click on jButton3 and rename it
Exit
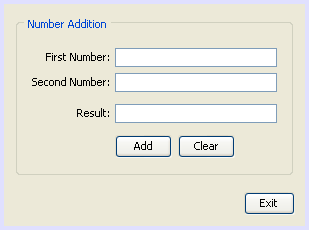
Your Finished GUI should now look like this:
Exercise 3: Adding Functionality
In this exercise we are going to give functionality to the Add, Clear, and
Exit buttons. The jTextField1 and jTextField2 boxes will be used for user input
and jTextField3 for program output - what we are creating is a very simple calculator.
Let's begin.
Making the Exit Button Work
In order to give function to the buttons, we have to assign an event
handler to each, responding to an event.
In our case we want to know when the button is pressed, either by mouse
click or via keyboard. So we will use ActionListener responding to ActionEvent.
Right Click on the Exit button.
From the pop-up menu choose Events --> Action --> ActionPerformed.
Note that the menu contains many more events you can respond to!
When you select the actionPerformed event, the IDE will automatically
add an ActionListener to the Exit button and generate a handler method
for handling the listener's actionPerformed method.
- The IDE will open up the Source Code window and scroll to
where you implement the action
you want the button to do when the button is pressed (either by mouse
click or via keyboard).
Your Source Code window should contain the following lines:
private void jButton3ActionPerformed(java.awt.event.ActionEvent evt) {
    //TODO: Add your handling code here:
}
- We
are now going to add code for what we want the Exit Button to do. You will have to type
System.exit(0); to the above code, replacing the TODO line.
Your finished Exit button code should look like this:
private void jButton3ActionPerformed(java.awt.event.ActionEvent evt) {
    System.exit(0);
}
Making the Clear Button Work
- Click on the Design tab at the top of your work area to go back to the
Form Design
- Right Click on the Clear button (jButton1). From the pop-up menu select
Events --> Action --> actionPerformed.
- We are going to have the Clear button erase all text from the jTextFields.
To do this, you will add some code like above. Your finished source code should look
like this:
private void jButton1ActionPerformed(java.awt.event.ActionEvent evt){
    jTextField1.setText("");
    jTextField2.setText("");
    jTextField3.setText("");
}
The above code changes the text in all three
of our jTextFields to nothing, in essence it is overwriting the existing
Text with a blank.
Making the Add Button Work
The Add button will perform
three actions.
- It is going to accept user input from jTextField1 and jTextField2 and
convert the input from a type String to a float.
- It will then perform
addition of the two numbers and finally,
- it will convert the sum to a type String
and place it in jTextField3.
Lets get started!
- Click
on the Design tab at the top of your work area to go back to the
Form Design.
- Right-
click on the Add button (jButton3). From the pop-up menu, select Events -->
Action --> actionPerformed
- We are going to add some code to have our Add button work. The
finished source code shall look like this:
private void jButton2ActionPerformed(java.awt.event.ActionEvent evt){
    // First we define float variables.
    float num1, num2, result;
    // We have to parse the text to a type float.
    num1 = Float.parseFloat(jTextField1.getText());
    num2 = Float.parseFloat(jTextField2.getText());
    // Now we can perform the addition.
    result = num1+num2;
    // We will now pass the value of result to jTextField3.
    // At the same time, we are going to
    // change the value of result from a float to a string.
    jTextField3.setText(String.valueOf(result));
}
Our Program is now complete we can now build and run it to see it in action.
Exercise 4: Running the Program
The final step is to build and run the program.
- Click on Build in the Main Menu
and Choose --> Build Main Project.
- When the Build output is finished,
click on Run in the Main Menu and Choose --> Run Main Project
- If you get a window informing you
that Project NumberAddition does not have a main class set, then
you should select my.NumberAddition.NumberAdditionUI as the main
class in the same window and click the OK button.
- Your created program is now running.
In this tutorial you learned how you hook up functionality to
GUI components with the NetBeans GUI Builder Matisse.
How Event Handling Works
This tutorial showed how to respond to s simple button event.
There are many more events you can have your application respond to. The IDE can help you find the
list of available events your GUI components can handle:
Go back to the file NumberAdditionUI.java in the Editor.
Click the Design tab to see the GUI's layout in the GUI Builder Matisse.
Right-click any GUI component, and select Events from the pop-up menu.
For now, just browse the menu to see what's there, you don't need to select anything.
Alternatively, you can select Properties from the Window menu. In the Properties window, click the Events tab.
In the Events tab, you can view and edit events handlers associated with the currently active GUI component.
You can have your application respond to key presses, single,
double and triple mouse clicks, mouse motion, window size and focus changes.
You can generate event handlers for all of them from the Events menu.
The most common event you will use is an Action event.
(Learn best practices for Event handling from Sun's Java Events Tutorial.)
How does event handling work? Everytime you select an event from the Event menu,
the IDE automatically creates a so-called event listener for you, and hooks it up to your component.
Go through the following steps to see how event handling works.
Go back to the file NumberAdditionUI.java in the Editor. Click the Source tab to see the GUI's source.
Scroll down and note the methods jButton1ActionPerformed(),
jButton2ActionPerformed(), and jButton3ActionPerformed() that you just implemented.
These methods are called event handlers.
Now scroll to a method called initComponents(). If you do not see this method,
look for a line that says Generated Code; click the + sign next to it
to expand the collapsed initComponents() method.
First, note the blue block around the initComponents() method. This code was auto-generated
by the IDE and you cannot edit it.
Now, browse through the initComponents() method. Among other things,
it contains the code that initializes and places your GUI components on the form.
This code is generated and updated automatically while you place and edit components in the Design view.
In initComponents(), scroll down to where it says
jButton3.setText("Exit");
jButton3.addActionListener(new java.awt.event.ActionListener() {
    public void actionPerformed(java.awt.event.ActionEvent evt) {
           jButton3ActionPerformed(evt);
    }
});
This is the spot where an event listener object is added to the GUI component;
in this case, you register an ActionListener to the jButton3.
The ActionListener interface has an actionPerformed method taking ActionEvent
object which is implemented simply by calling your jButton3ActionPerformed event handler.
The button is now listening to action events. Everytime it is pressed an
ActionEvent is generated and passed to the listener's actionPerformed method
which in turn executes code that you provided in the event handler for this event.
Generally speaking, to be able to respond, each interactive GUI component
needs to register to an event listener and needs to implement an event handler.
As you can see, NetBeans IDE handles hooking up the event listener for you, so you can concentrate
on implementing the actual business logic that should be triggered by the event.
Next Steps
- Matisse GUI Builder - Frequently Asked Questions
- Code Samples at Java Almanac: Java Events
- Learn best practices for Event handling from Sun's Java Events Tutorial.
- Learn how to Connect a GUI to a Derby Database with NetBeans IDE
- To send comments and suggestions, get support, and keep informed on the latest
developments on the NetBeans IDE J2EE development features, join the
mailing list.